Page 2 of 5 FirstFirst 1234 ... LastLast
Results 21 to 40 of 100

Update on water tanks - Page 2

| A Day in the Life of a Scrapper
  1. #21
    Patriot76 started this thread.
    Patriot76's Avatar
    SMF Badges of Honor


    Member since
    Dec 2012
    Location
    Buffalo Commons
    Posts
    2,949
    Thanks
    10,591
    Thanked 7,218 Times in 2,256 Posts
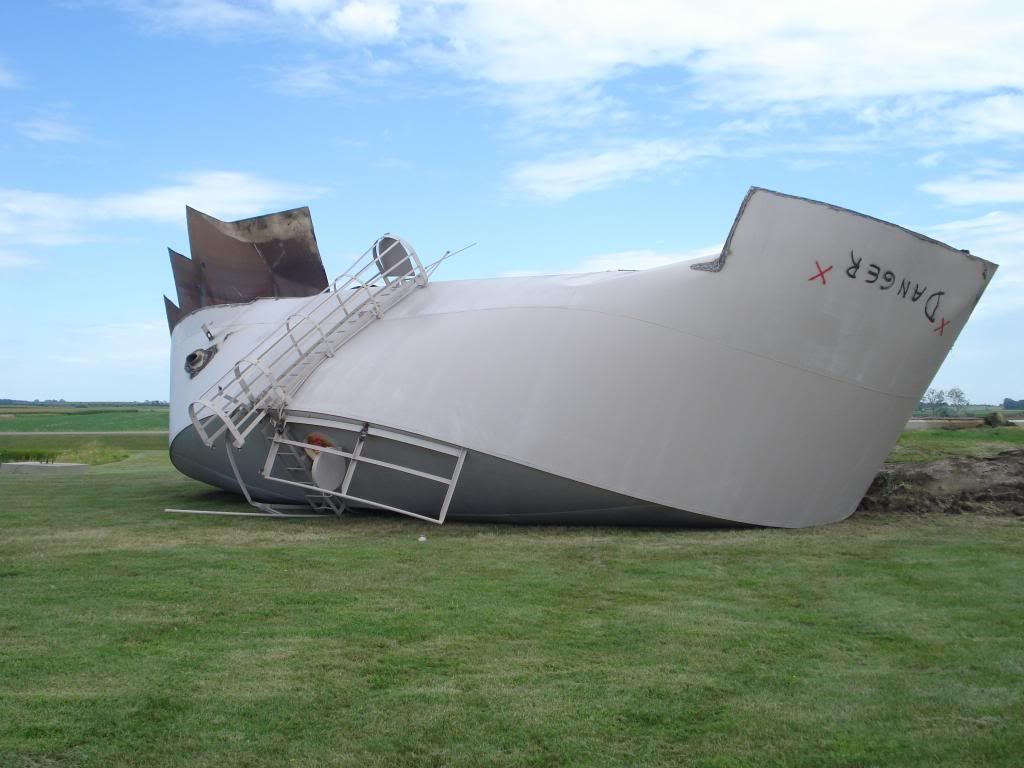
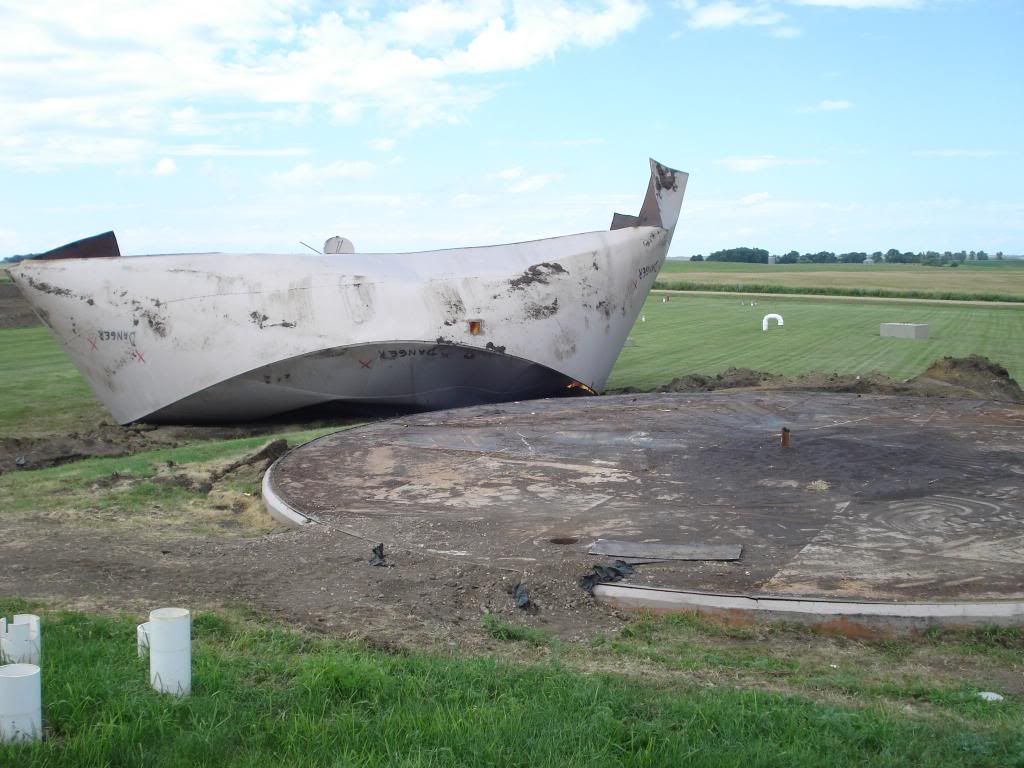
    The northwest corner of the tank is on the ground up to the roof and the wings on the east and west are buried six foot in the ground. The idea of rocking the tank back and forth is out and now I decided to try to flip it on its top. The idea was to put it on its top and like a turtle it would be helpless. First I built dirt saddles on each side of the northwest corner to keep the tank from rolling when I tried to pull it over. Then I cut four inch pipe from the water filters and buried them upright in front of the northwest corner to keep the tank from sliding when I pulled it. I attached a chain and tow strap to the highest point on the southeast corner and ran it over the roof to the loader. When I pulled the chain broke and flew a couple of hundred yards.


    The managers of the water district came to my rescue at this point. First they recommended I run my chains and strap through a tire so if it broke, the tire would lay the chain on the ground instead of being a flying projectile. Individuals have been killed from flying chains so at the very least it is recommended that you throw a jacket on a chain if you are pulling a stuck vehicle. Second they offered to dig a trench in front of the tank so it could slide into it and flip easier. I borrowed heavier strap, chains, and cable that allowed me to pull from 100 yards away. This allowed me leverage on the tank to allow it to flip (their idea). Below is a video that provided a great deal of relief for my efforts.


    http://s1277.photobucket.com/user/mi...fd9d4.mp4.html
    Last edited by Patriot76; 09-04-2013 at 04:42 PM.

  2. The Following User Says Thank You to Patriot76 for This Post:


  3. #22
    Patriot76 started this thread.
    Patriot76's Avatar
    SMF Badges of Honor


    Member since
    Dec 2012
    Location
    Buffalo Commons
    Posts
    2,949
    Thanks
    10,591
    Thanked 7,218 Times in 2,256 Posts
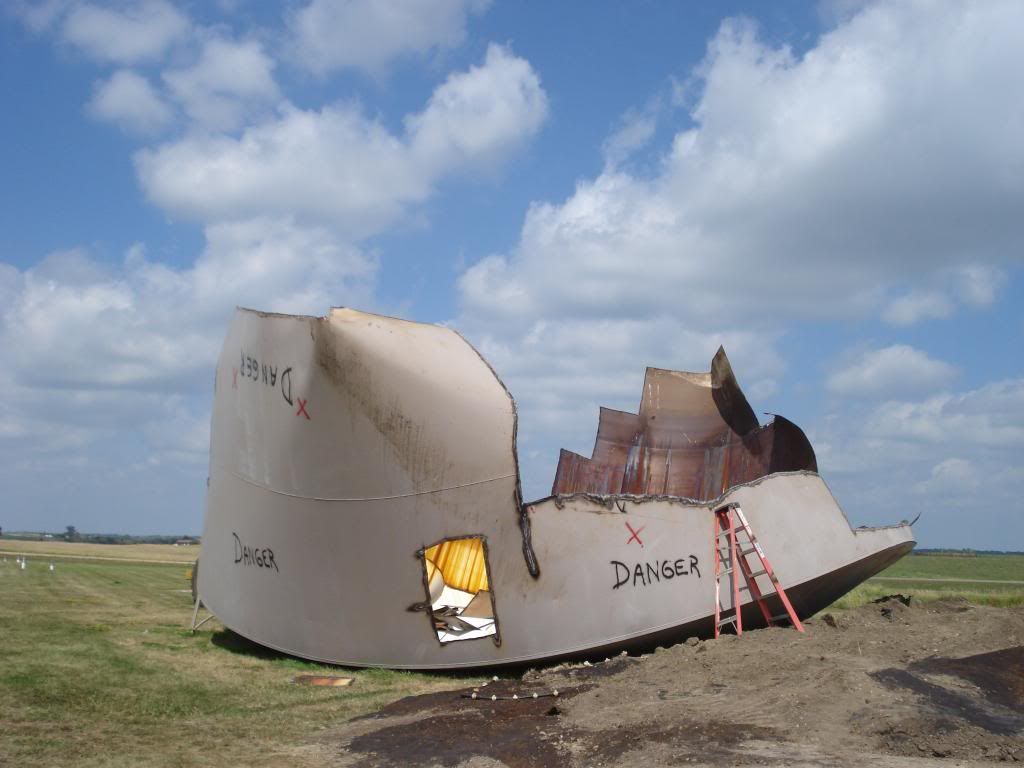
    Since the tank flipped, the northwest corner has become the southeast corner. The high side of the tank is 28 ft. and the southwest side is 16 plus ft. in the air. The other two sides are actually hanging inside the tank and still about 16 ft. The hanging sides are stressed. I decided to start cutting the excess weight on the stressed sides as far down as I could. I thought if I could cut them down far enough I could just cut the high sides from the roof and let them fall.


    Last edited by Patriot76; 09-01-2013 at 08:04 AM.

  4. The Following 5 Users say Thank You for This Post by Patriot76:


  5. #23
    MattInTheHat's Avatar
    SMF Badges of Honor


    Member since
    Sep 2012
    Location
    rock hill, sc
    Posts
    1,464
    Thanks
    1,142
    Thanked 1,396 Times in 703 Posts
    I like the tip about the Tire on the chains, I will definitely pass that on.

  6. The Following 2 Users say Thank You for This Post by MattInTheHat:


  7. #24
    Patriot76 started this thread.
    Patriot76's Avatar
    SMF Badges of Honor


    Member since
    Dec 2012
    Location
    Buffalo Commons
    Posts
    2,949
    Thanks
    10,591
    Thanked 7,218 Times in 2,256 Posts
    Once again I must emphasize this is not a how to thread. It is only a journal of my experience. It would be great if some could benefit from my experiences, but I would not recommend anyone try this. There is a reason professionals make good money, they have earned it through education and experience. Safety was my first priority throughout the project, although I violated the most important one from the start, do not swim alone.
    Last edited by Patriot76; 09-01-2013 at 09:32 AM.

  8. The Following 8 Users say Thank You for This Post by Patriot76:


  9. #25
    bigdog72's Avatar
    SMF Badges of Honor


    Member since
    Dec 2012
    Location
    honey brook PA
    Posts
    274
    Thanks
    14
    Thanked 137 Times in 68 Posts
    this is amazing, nice work patriot I couldnt imaging doing this alone

  10. The Following User Says Thank You to bigdog72 for This Post:


  11. #26
    Mechanic688's Avatar
    SMF Badges of Honor


    Member since
    Mar 2011
    Location
    Warsaw , Ind. In the heart of the lakes, and down the street from the hotel where Al Capone stayed.
    Posts
    9,568
    Thanks
    11,247
    Thanked 10,730 Times in 4,728 Posts
    Partiot, Any ideas yet on how much expense went into this and the final profit??
    Good job documenting it. This is something for others to learn from.
    P & M Recycling - Specializing in E-Waste Recycling.
    If you enjoy your freedom, thank a vet.

  12. The Following 2 Users say Thank You for This Post by Mechanic688:


  13. #27
    Patriot76 started this thread.
    Patriot76's Avatar
    SMF Badges of Honor


    Member since
    Dec 2012
    Location
    Buffalo Commons
    Posts
    2,949
    Thanks
    10,591
    Thanked 7,218 Times in 2,256 Posts
    I am still putting together the numbers to figure the expenses. Right off the top of my head I know the boom lift cost $ 2,000, I used nine liquid oxygen tanks, 10 100 lb. propane bottles, ruined six 50 ft. cutting hoses, went through six pairs of welding gloves, purchased eight torch tips, destroyed one set of sleeves and cape, ruined two cotton welding jackets, replaced one gas gage on my torch, had to purchase another 20 inch scrapper torch, and ruined two pairs of Duluth Fire Hose pants. Boots were another big expense. Two pairs were abused because of the heat. I still have to figure diesel for the loader, skid steer, and truck, gas for my welder, hydraulic fluid, grease, and other maintenance items. The biggest loss was a pair of expensive sunglasses my wife gave me for our anniversary eight years ago. I have guarded them with my life until now, but they went up in a flame of glory. This story might be told later in the post.

    I was using 100 ft. of 3/8 cutting hose throughout the project and all of the hoses were lost because of the lack of concentration. Sometimes a piece of steel fell and sliced them, sometimes they were caught in a fire, one time the entire tank fell on them and sliced two right at the connection, and one just disappeared off the tank. I will point out that using this length of hose I set my gauges at 12 propane and 62 oxy. I usually burn at 10 and 50 but with the additional length of hose they recommend an increase of 10 %. I know there are a lot of opinions on this site as far as settings, but I found when I burn hotter and harder I save on the torch and the tips in the long run. The other tip I would provide is that you have to cut hard with liquid oxygen because it is a pressure activated tank and will bleed off if not used.

    The Duluth Fire Hose pants are a great product that I would recommend highly. They went through a lot and 10 pairs of Carhart's could not have done the same. I went through four pairs of Carhart's before I bought the Duluth Fire Hose pants. The excessive abuse on welding gloves was the result of over head cutting on the filters filled with sand and cutting with one hand and controlling steel plates with the other. I only had a 20 inch scrapper torch and no way to avoid the heat produced by the sand. I have already talked about the damage the rust and sand did to the cutting tips, but if I did not burn so hot I am sure I would have gone through twice as many. The gas gauge replacement was the result of a brain fart, when I changed tanks I put the gauge on the top of the liquid oxygen tank and it froze the diaphragm. I am a big believer in Smith Torches and Gauges. Until this situation I have had the same set for over 15 years, only the last couple cutting on a daily basis. The snaps wore out on the cape and sleeves and the two cotton welding jackets. I must have been in a hurry to remove them whenever I could because of the heat.

    I will also be figuring in the cost of powdered Gatorade in my profit/loss spreadsheet. I am not sure of the exact amount, but I am guessing I drank more than the entire Florida Gators football team did during spring training. It might equal the cost of gas for my torch. I know this is not the answer you wanted, but it is the best I can do at the moment.

    I will not be providing a final profit because I am not sure I want to know. This project has been assigned to advertising on my spread sheet. I even painted my company name on the tanks with the warnings and danger signs. I will be providing enough information throughout this thread that others will be able to estimate a profit in their market. I also need to point out that I got 400 sq. ft. of cedar tongue and grove and gravel 6 ft. X 40 ft. diameter from the project. Scrapping is not always in the metal.
    Last edited by Patriot76; 09-02-2013 at 05:58 AM.

  14. The Following 7 Users say Thank You for This Post by Patriot76:


  15. #28
    sawmilleng's Avatar
    SMF Badges of Honor


    Member since
    Feb 2013
    Location
    Central Kootenays, BC, Canada
    Posts
    861
    Thanks
    713
    Thanked 1,200 Times in 521 Posts
    Wow, you have big nackers to take a job of that size on alone. But you made it, safely, and probably there are lots of locals who noticed your efforts. I hope you at least broke even. Locals will remember you now when they have scrap or something that needs to be demolished.

    I got to hand it to you in using what you had available. That loader sounds like it was a real big help.

    How do the guys do it that take them down in 36 hours? Do they lift the roof off and then take the sides down a few feet at a time?

    Good Job!

    Jon.

  16. The Following User Says Thank You to sawmilleng for This Post:


  17. #29
    Patriot76 started this thread.
    Patriot76's Avatar
    SMF Badges of Honor


    Member since
    Dec 2012
    Location
    Buffalo Commons
    Posts
    2,949
    Thanks
    10,591
    Thanked 7,218 Times in 2,256 Posts
    According to my wife, big nackers no, small brain yes. As far as breaking even, yes but the hourly wage would be the hard part to swallow. It is not like my regular scrapping produces a great hourly wage, but it is not as dangerous. I was able to give both of my sons money for their efforts that they are using for college. I talked about my older son helping on the tank. Before he left we discussed the entire process and he provided input after returning to school. My other son collected and stacked bales of hay so I could concentrate on the tanks.

    As far as the professionals, I can only relate what I have been told. They are reluctant to share their trade secrets for two reasons, competition and liability. I talked to the one that took down the tank 45 miles away on the phone. This is the closest scrap yard in the area. I also visited with the manager of the scrap yard, the owner of the place they rented the lifts, and several other individuals that watched the process. Depending on the individual, the company had between three and five workers on lifts cutting the edge of the roof. They were strategically located and cutting at the same speed. The cutting was synchronized and all finished their last cut at the same time to allow the top to drop straight down inside the tank. With the same precision they started cutting the sides all around the tank allowing each piece to drop. They cut the entire tank in pieces just large enough to fit on a semi to haul to the yard. They used six foot scrapper torches, liquid oxygen, and propane. The owner of the company made a video with time lapse pictures. A friend of mine saw it.

    During the six and a half weeks on the project, I had to take a week and half off to haul hay and horses to Wyoming. I also had two water filters that the company did not have to deal with. These were more time consuming than the tank. I will be turning the direction of this thread to those when I have completed telling the story of the water tank.

  18. The Following 4 Users say Thank You for This Post by Patriot76:


  19. #30
    Patriot76 started this thread.
    Patriot76's Avatar
    SMF Badges of Honor


    Member since
    Dec 2012
    Location
    Buffalo Commons
    Posts
    2,949
    Thanks
    10,591
    Thanked 7,218 Times in 2,256 Posts
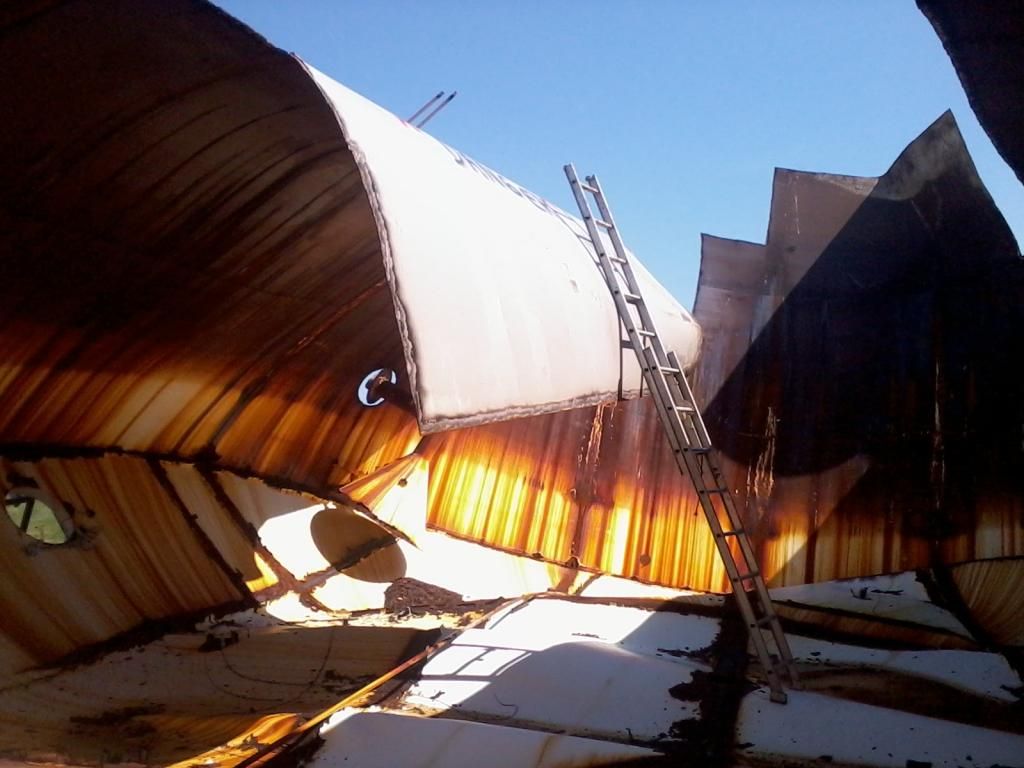
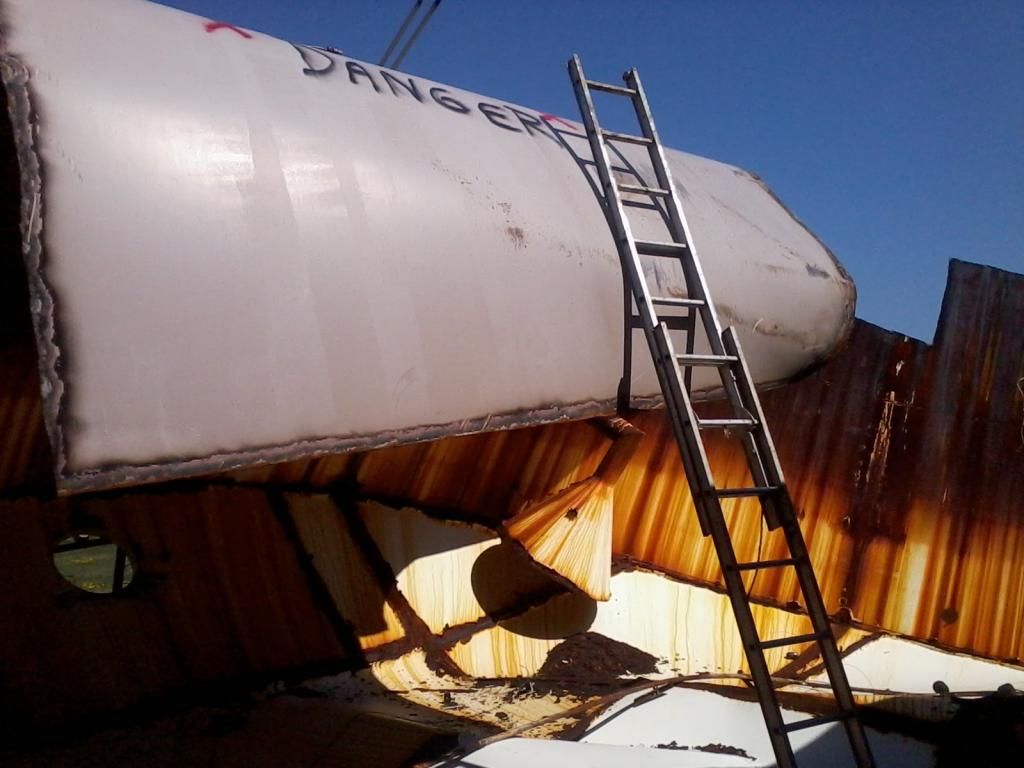
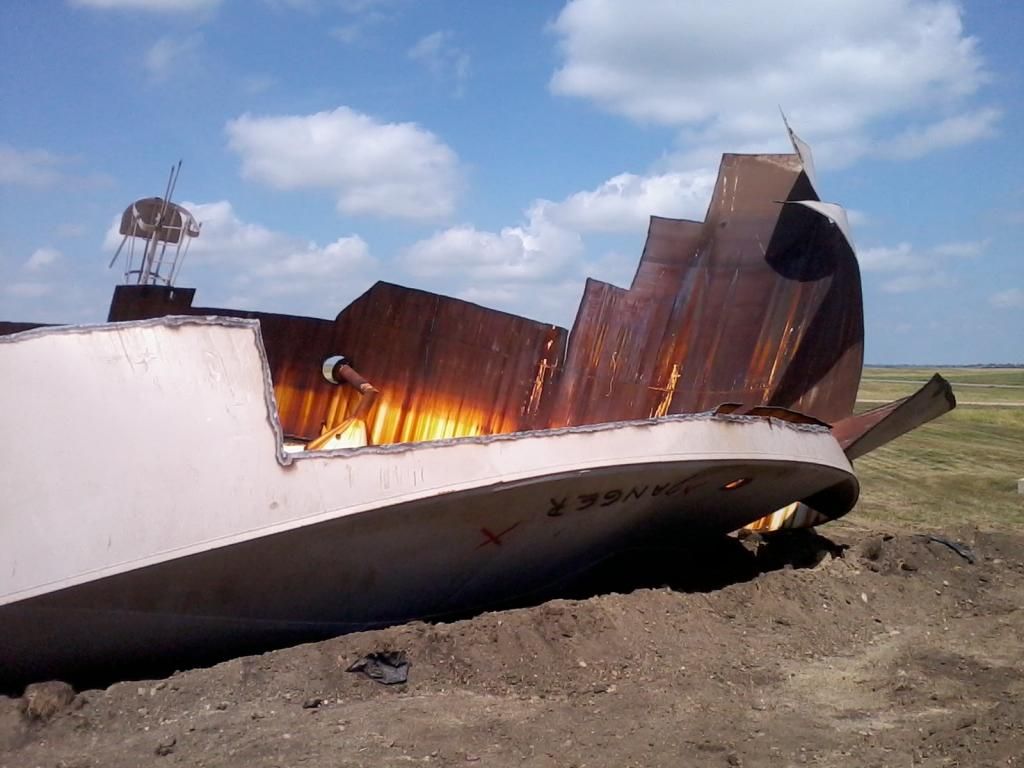
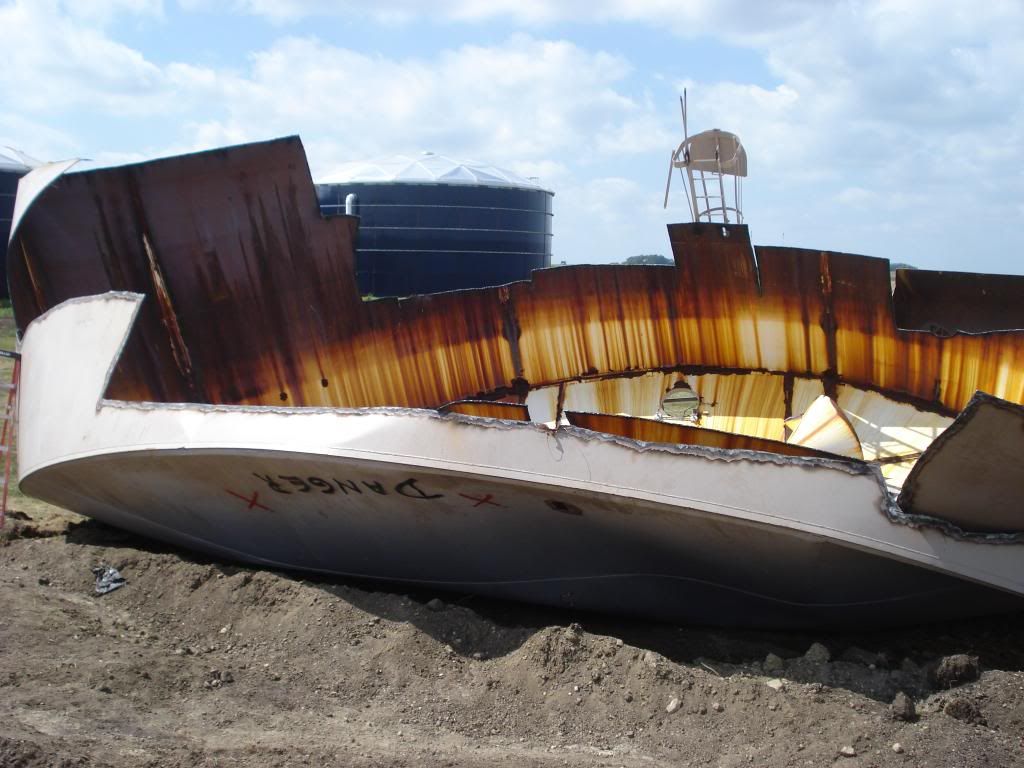
    Back to the pictures. These pictures show the hanging sides inside the tank after the tank was flipped. We joke that we need a logging chain as a wind vane. Imagine wind strong enough to move these pieces of steel. I can assure you they were flapping in the wind and the entire tank would vibrate. The over hang is 8 ft. X about 16 ft. That is about 1,300 lbs. of steel blowing in the wind. These were cut in small pieces because it was done from the ladder. The steel was allowed to drop inside the tank as later pictures will show. One of the pictures shows the shadow of the south side hanging down. I was able to cut the south side from the top.


    Last edited by Patriot76; 09-02-2013 at 06:39 AM.

  20. The Following User Says Thank You to Patriot76 for This Post:


  21. #31
    Patriot76 started this thread.
    Patriot76's Avatar
    SMF Badges of Honor


    Member since
    Dec 2012
    Location
    Buffalo Commons
    Posts
    2,949
    Thanks
    10,591
    Thanked 7,218 Times in 2,256 Posts
    This picture shows the south side of the tank after cutting down the side. Part of this side was horizontal and I was able to stand on it while cutting. The rest was cut using the loader and a ladder.

    The door in the side was cut to allow access inside the tank to get the ladders in position shown in the previous pictures.

    Last edited by Patriot76; 09-02-2013 at 06:52 AM.

  22. The Following 3 Users say Thank You for This Post by Patriot76:


  23. #32
    Patriot76 started this thread.
    Patriot76's Avatar
    SMF Badges of Honor


    Member since
    Dec 2012
    Location
    Buffalo Commons
    Posts
    2,949
    Thanks
    10,591
    Thanked 7,218 Times in 2,256 Posts
    This shows the south side cut down to the roof. On the north side you can see the ladder that was used to access the roof. It can be seen in a picture of my son earlier in the post.


  24. The Following 4 Users say Thank You for This Post by Patriot76:


  25. #33
    Patriot76 started this thread.
    Patriot76's Avatar
    SMF Badges of Honor


    Member since
    Dec 2012
    Location
    Buffalo Commons
    Posts
    2,949
    Thanks
    10,591
    Thanked 7,218 Times in 2,256 Posts
    This shows the progress on the north side of the tank. The west wing is 16 ft. of steel sitting four ft. off the ground because of a buckle in the roof steel. One of the two new district water tanks can be seen in the back ground. I know I will not be scrapping these for three reasons. One they will out live me, two they have a glass coating, and three I already completed my once in a life time challenge.

    Last edited by Patriot76; 09-02-2013 at 07:02 AM.

  26. The Following 4 Users say Thank You for This Post by Patriot76:


  27. #34
    Patriot76 started this thread.
    Patriot76's Avatar
    SMF Badges of Honor


    Member since
    Dec 2012
    Location
    Buffalo Commons
    Posts
    2,949
    Thanks
    10,591
    Thanked 7,218 Times in 2,256 Posts
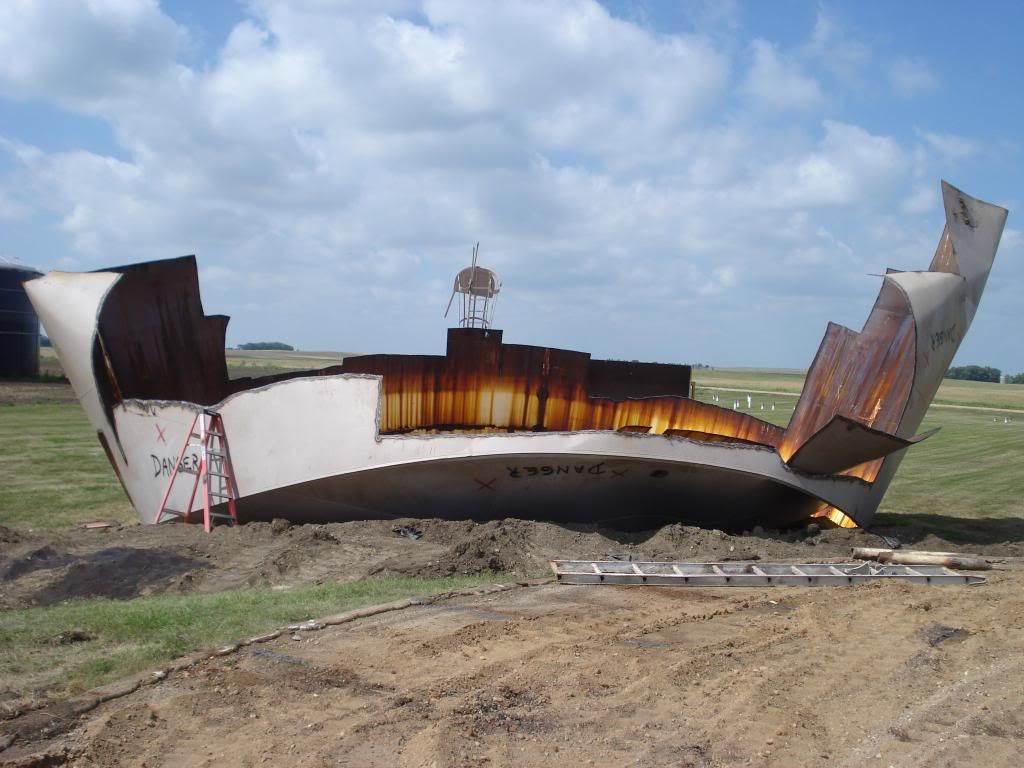
    At this point both sides have been lowered and the wings are in the air. I did not want to cut any lower on the north side because the ladder was braced in the ground and I did not know how the tank would buckle with the weight of the wings. The wing on the east side is 24 ft. tall. I had no intention of cutting it in the air and hoped my strategy would work.

    Last edited by Patriot76; 09-02-2013 at 07:12 AM.

  28. The Following 3 Users say Thank You for This Post by Patriot76:


  29. #35
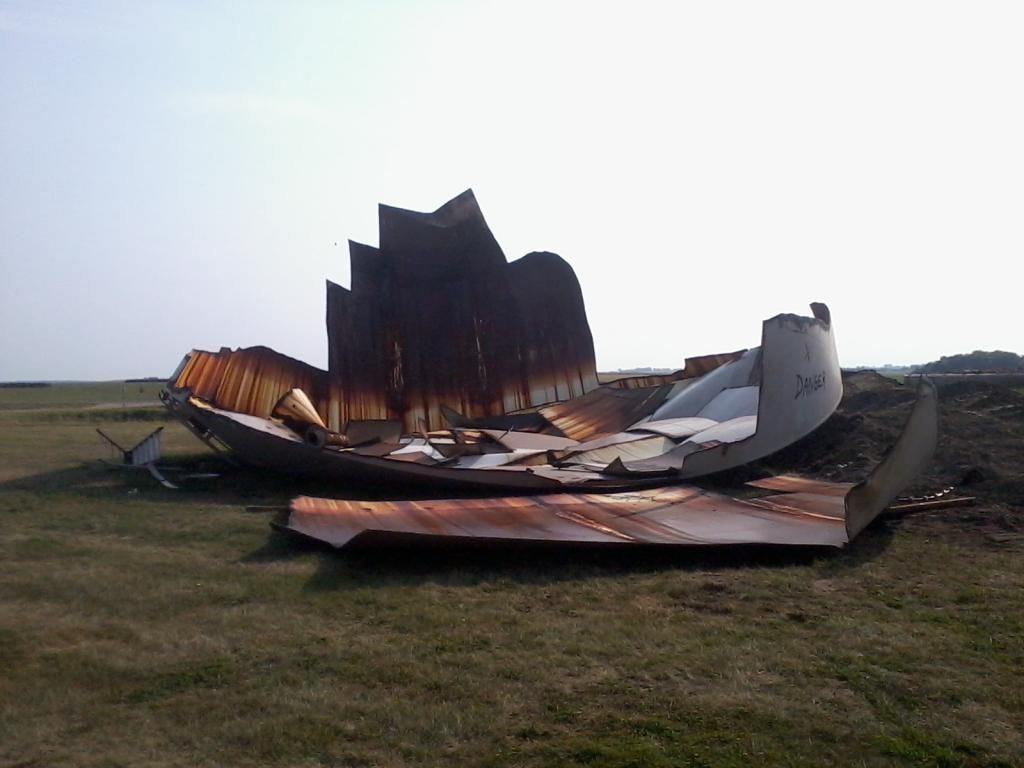
    Patriot76 started this thread.
    Patriot76's Avatar
    SMF Badges of Honor


    Member since
    Dec 2012
    Location
    Buffalo Commons
    Posts
    2,949
    Thanks
    10,591
    Thanked 7,218 Times in 2,256 Posts
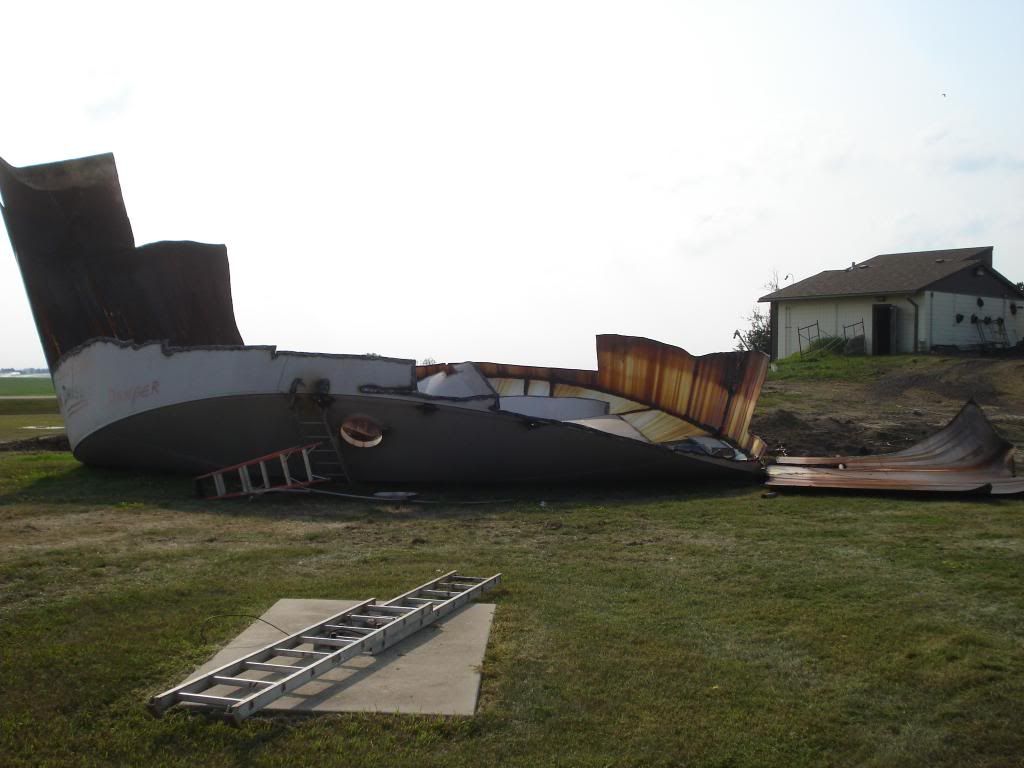
    It was time to test my theory. This shows the tank after cutting the west wing down. I started by cutting down the remaining north side wall then started cutting where the wing met the roof. As I cut the wing slowly started laying down. When I cut down the south wall, the wing laid down quietly. Relief. I started on this side because it was not as tall or wide as the other wing. The ladder in the foreground was put there on purpose. It is the old footing for a wind mill they use to have. It had bolts sticking up and I did not want to drive over it and blow a tire. This way I could blow a tire and ruin a ladder at the same time.

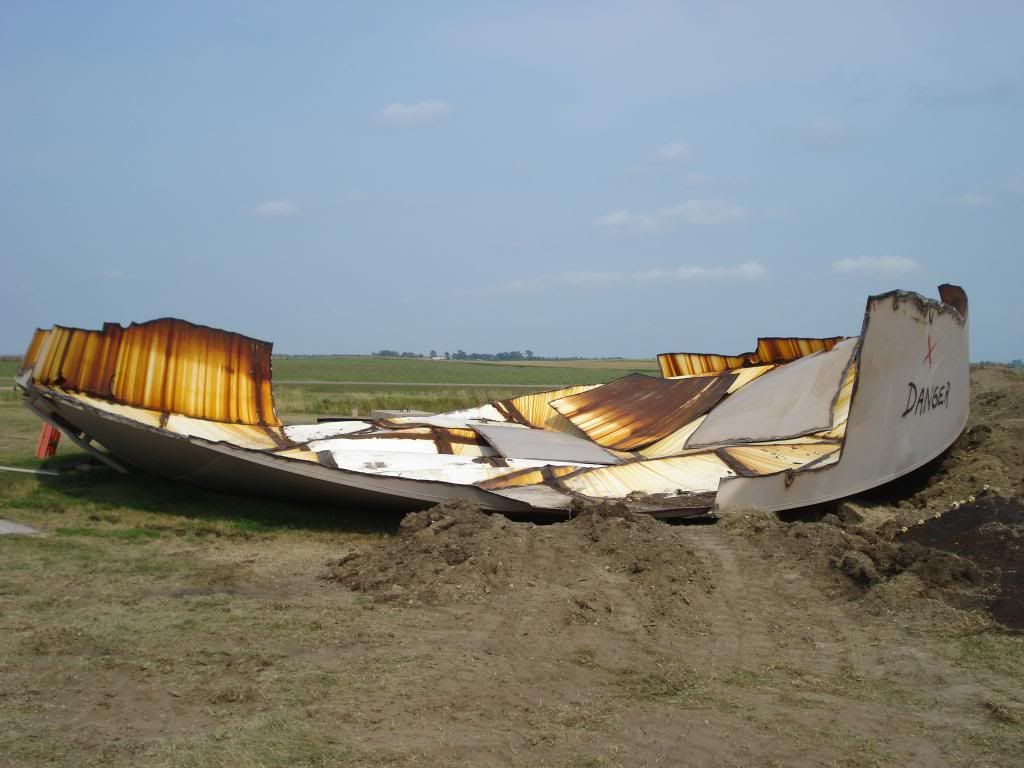
    These pictures do not do justice to the size of the metal I was dealing with.


  30. The Following 3 Users say Thank You for This Post by Patriot76:


  31. #36
    Patriot76 started this thread.
    Patriot76's Avatar
    SMF Badges of Honor


    Member since
    Dec 2012
    Location
    Buffalo Commons
    Posts
    2,949
    Thanks
    10,591
    Thanked 7,218 Times in 2,256 Posts
    The same process was used on the east wing, cutting down the south wall, along where it met the roof, and finally down the north wall. Same results and relief. In the foreground you can see the ramp to access the inside of the tank with my skid steer. When I would get over heated and tired of cutting I would load the steel I could get to. I tried to haul loads during the heat of the day. I was trying to get as much steel in as fast as I could because I was fearful the price of steel would drop.

    I sold the majority of the steel as unprepared. I was good enough with a torch to make money preparing it, but did not want to be in a situation where the price of steel dropped and my prepared was worth as much as it was a day before unprepared. Another consideration was the load itself. It was easier to haul large pieces than the prepared steel. I made a deal with the scrap yard that prepared could be cut 5 ft. x 18 in. Using liquid oxy., propane, and scrapping torch reduced my costs a lot, but not enough to gamble with the fluctuating market.

    From this point on the cutting was on the ground with no surprises. Physically I was worn out and used a stool to cut from this point on. This was where the boots took a beating. Sitting on the steel while cutting melted the rubber. I used my leather cape, chaps, and welding jackets to deflect the heat, but it did not save the boots and destroyed all of them. The additional problem was the rust from the beams on the roof. Melting it while cutting the steel did a number on the torch tips. The second part of the story involves the water filters, an even bigger challenge. I will be documenting this story in future posts.

    I also need to thank the managers of the water district for their help and support. They are amazing individuals that have a great deal of common sense and are down to earth individuals. I mentioned several of their contributions, but they had many more. I learned a great deal from them. Without them I could not have completed the project.

    Last edited by Patriot76; 09-04-2013 at 05:57 PM.

  32. The Following 4 Users say Thank You for This Post by Patriot76:


  33. #37
    Patriot76 started this thread.
    Patriot76's Avatar
    SMF Badges of Honor


    Member since
    Dec 2012
    Location
    Buffalo Commons
    Posts
    2,949
    Thanks
    10,591
    Thanked 7,218 Times in 2,256 Posts
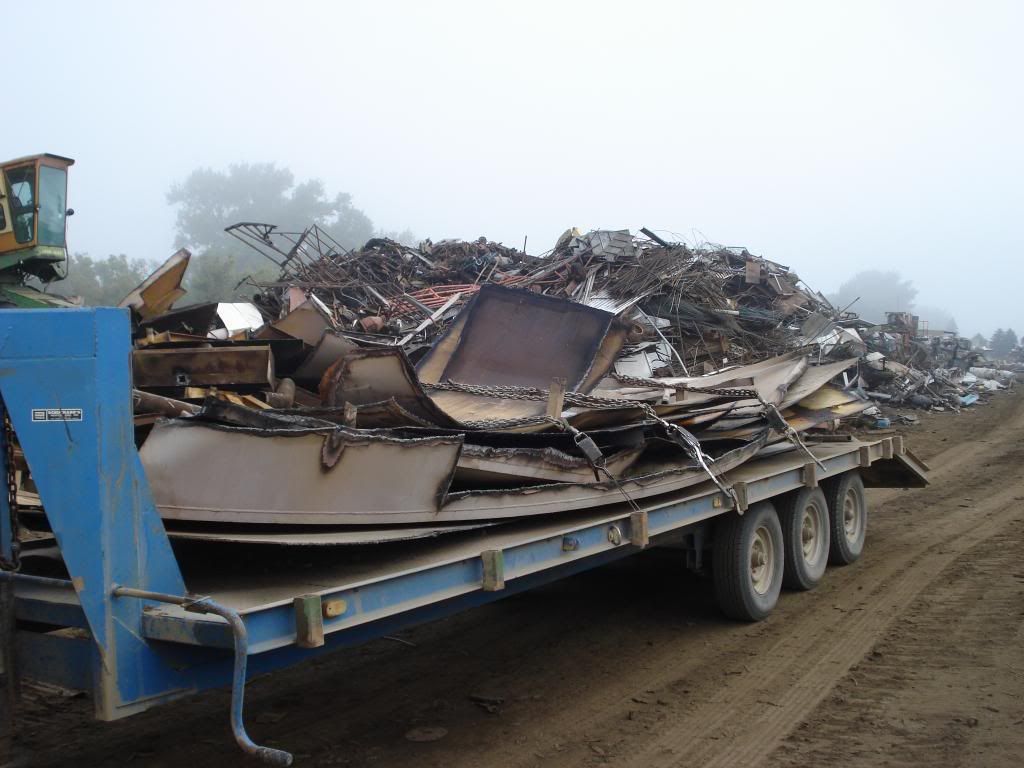
    This is a picture of the last load cut from the picture above. My loads averaged six tons each. In the picture above in the front right corner you can see a torch mark. That same piece of steel is in the front foreground of the trailer.

    I should mention I am a retired educator after 30 years in the profession. Before that I was a millwright for five years building sawmills. I have two knee replacements caused from wrestling in college. And the real kicker, I am scared to death of heights. Now you know why this was a personal challenge I could not pass up. It was never about the money, only the challenge. Live life to the fullest.

    Last edited by Patriot76; 09-02-2013 at 08:25 AM.

  34. The Following 8 Users say Thank You for This Post by Patriot76:


  35. #38
    Patriot76 started this thread.
    Patriot76's Avatar
    SMF Badges of Honor


    Member since
    Dec 2012
    Location
    Buffalo Commons
    Posts
    2,949
    Thanks
    10,591
    Thanked 7,218 Times in 2,256 Posts
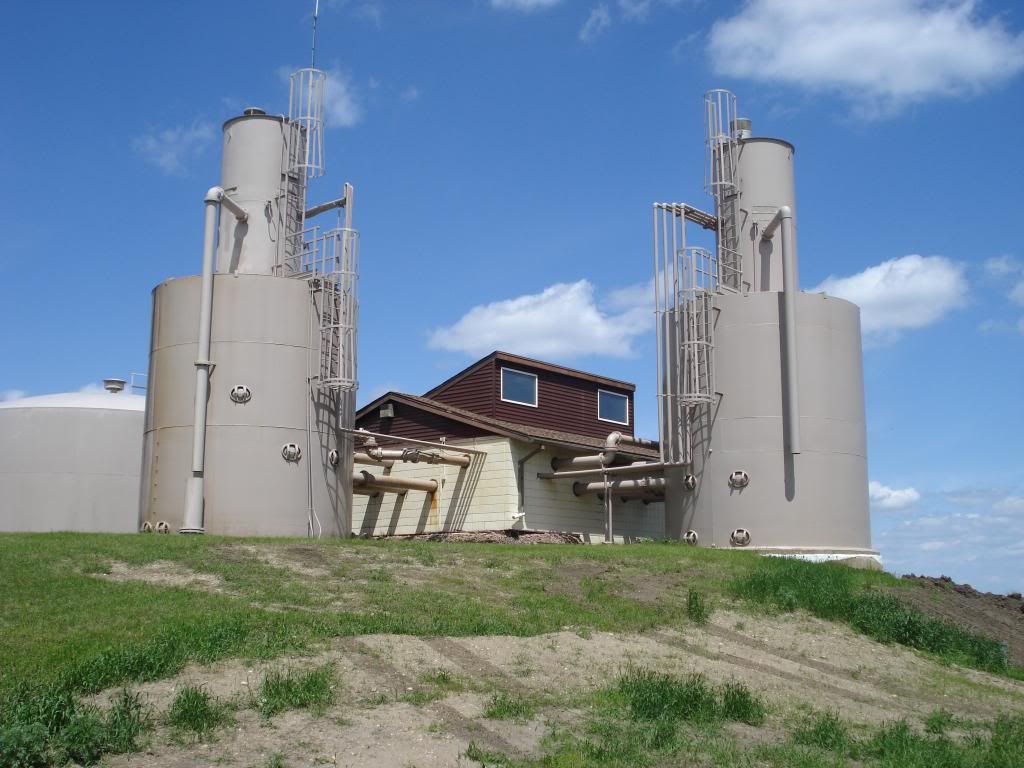
    Now it is time to discuss the water filters. I was working on them at the same time as the tank. When one would present a new challenge, I would work on the other while thinking about solutions for the problem. These were trickier than the water tank because of all of the pipes, interconnected parts, and sand. I estimate they weighed 10 tons each based on the total steel hauled and my estimate of the water tank. It was harder to estimate the filters because of all of the pipes, I-beams, angle iron, bracing, and quadrant design. They were 16 ft. in diameter at the base 14 ft. tall. This comprised two sections of the filter. The top section was 8 ft. in diameter 10 ft. tall I think.

    Notice the cast iron pipe running from the filters to the control building. I cut the top of the pipe narrower than the bottom to allow them to fall. I also took down the pipes hanging from the filter before starting on the filters themselves. There is still about 2 tons of cast iron pipe in the building that I will collect after they do the demolition.

    Last edited by Patriot76; 09-05-2013 at 06:38 PM.

  36. The Following 2 Users say Thank You for This Post by Patriot76:


  37. #39
    Patriot76 started this thread.
    Patriot76's Avatar
    SMF Badges of Honor


    Member since
    Dec 2012
    Location
    Buffalo Commons
    Posts
    2,949
    Thanks
    10,591
    Thanked 7,218 Times in 2,256 Posts
    This is a close up of the cast iron pipe running from the filters to the main control building. The first load of cast iron pipe was over 4 tons. I do not have pictures of the pipe on the other tank nor the pictures of the pipe at ground level. The previous picture gives you an idea of the number of pipes running between the tanks and the building.

    I will try to break down the basic structure of the filters here to help explain the challenges I faced later. The top of the filters was open with pipes that ran down to the second level and other pipes running to the bottom level. The base of the tanks was divided into quadrants divided by 1/4 in. sheet metal with 1/4 inch angle iron upright every 16 in. The center quadrant was 1/2 in. thick either bolted or welded depending on the tank. One tank was 10 yrs. older than the other. On the bottom sub-floor sat 3 ft. of sand and it sat 18 in. above the main floor to the filters. The area between the bottom sub-floor and the floor was 18 in. deep filled with sand. These two floors were connected with 2x2x1/4 angle iron welded to both.

    The bottom sub-floor also contained 16 pvc hoses in each quadrant to force water through the sand. Between the bottom sub-floor and the floor zinc plates were placed every foot to hydroelectric static. These were placed between the angle iron supports. The water filters also contain magnesium rods to prevent hydroelectric current from putting pin holes in the tanks. When you put a torch to the magnesium it sparks and burns hot.

    Last edited by Patriot76; 09-04-2013 at 09:21 PM.

  38. The Following 2 Users say Thank You for This Post by Patriot76:


  39. #40
    Patriot76 started this thread.
    Patriot76's Avatar
    SMF Badges of Honor


    Member since
    Dec 2012
    Location
    Buffalo Commons
    Posts
    2,949
    Thanks
    10,591
    Thanked 7,218 Times in 2,256 Posts
    In the video below you can see the door that was cut to access the inside of the tank. The first step was to cut about 10 pipes loose between the top and middles levels of the tank using an extension ladder. Then from the outside the side wall between the two levels was cut. On the top of the second level was 2 in. angle iron welded to the top in a series of spokes. I forgot to cut one of these loose and that is why the tank hung up. My son was with me to shoot this video. Notice the breaking chain. This is before I learned the tire trick talked about earlier in the post.

    After cutting the last spoke the tank easily fell right next to the water shut off for a community of about 1500 people. If that had fallen about another five yards, the community would have been without water until it was fixed. That would not have helped my reputation. Anyway all went well.

    http://s1277.photobucket.com/user/mi...99af9.mp4.html

  40. The Following 5 Users say Thank You for This Post by Patriot76:


  41. Similar threads on the Scrap Metal Forum

    1. Need ideas for scraping community water tanks
      By Patriot76 in forum Scrap Metal Questions and Answers
      Replies: 19
      Last Post: 06-19-2013, 07:55 AM
    2. hot water tanks
      By 708bigbuck in forum Scrap Metal Questions and Answers
      Replies: 17
      Last Post: 07-28-2012, 11:08 PM
    3. Hot water tanks
      By Cwatson325 in forum Scrap Metal Questions and Answers
      Replies: 4
      Last Post: 04-13-2011, 08:52 PM

Page 2 of 5 FirstFirst 1234 ... LastLast

Thread Information

Users Browsing this Thread

There are currently 6 users browsing this thread. (0 members and 6 guests)

 
Browse the Most Recent Threads
On SMF In THIS CATEGORY.


OR

Bookmarks

Posting Permissions

  • You may not post new threads
  • You may not post replies
  • You may not post attachments
  • You may not edit your posts
  •  

The Scrap Metal Forum

    The Scrap Metal Forum is the #1 scrap metal recycling community in the world. Here we talk about the scrap metal business, making money, where we connect with other scrappers, scrap yards and more.

SMF on Facebook and Twitter

Twitter Facebook