Wow, this is fascinating to me. I am glad it all went well for you.
I will be following the rest of your story with much interest.


Wow, this is fascinating to me. I am glad it all went well for you.
I will be following the rest of your story with much interest.


|
|


You did an interesting job. Did you have anyone looking for nice 4 x 8 sheets of 1/4" plate? I guess even from the big water tank every last piece had a bit of a curve to it. I sure as heck would have been wanting a bunch of that plate, curved or not, in my farmers "cultch" pile for projects!
Did you manage to get your yard to pay you more for the cast? It looks like you have a pretty good load of it.
Jon.


|
|


The floor of the main tank was 1/4 in. steel 40 ft. in diameter. It was flat except the welds. I cut sheets out for local farmers for loaning me their tow straps and chains. That reminds me, I did not include that in the weight totals and I owe the water district some more money.
Cast around here gets less than prepared iron. My first load of cast I thought was 8 tons, but looking back on my records it was only 4 tons. After this I added it to the prepared or unprepared steel and got more for it. I was honest with the yard, but they did not care. After all they ended up with 68.37 tons of steel from this project by the end.
I paid the district today, more than the agreed upon percentage. I increased the price per ton and gave them that percentage since they had been so helpful. I went in with the scale tickets and the break down of the loads. They did not question anything, much less look at the breakout. They trusted me and by treating them right karma was on my side. They ended up contracting me to do the demolition of the building and the ring wall. This will allow me to access the gravel, but I will not charge them for this time. Around here honesty goes a long ways and when you treat people right, they will treat you right.
Several asked earlier in the post how much I made. I can now answer that question. I made new friends, trusting relationships, and a good reputation. I made time for my family, worked hard, and listened. I came out of it with the life time experiences of the two water district managers and many farmers in the area. When I was younger I went to college and paid for an education. I paid tuition on this project, but the knowledge gained was far more valuable than the college education. Karma aside, honesty pays in the long run.
Last edited by Patriot76; 09-05-2013 at 04:11 AM.


|
|


Your last two paragraphs are the most important thing in this entire thread. It echos what I have found on this forum in many instances. There isn't any question in my mind of your honesty, integrity and willingness to tackle a challenge. Thank you for letting us all benefit from this monumental task that you undertook. Your willingness to share will save many of us time in the future. Thanks.


|
|


Sawmill,
Auto correct would not allow me to properly address you. I have some for barter for a walleye fishing trip.


|
|


No walleye in my area, unless I know the fish by another name. We have cutthroat trout, bull trout and Kokanee, which is a land-locked salmon. I never learned to like trout but I can eat salmon by the....well, a LOT! Theres a zillion lakes around here and my family and I must have camped by a good percentage of them.
You built sawmills? I spent 30 years engineering them...started with the old headrig/carriage (400 logs/shift) finished with the SST slew/skew/tilt canter lines at 10,000 logs/shift. Got it in the neck when the company changed hands and the new guys didn't do their own engineering.
Jon.


|
|


One of the more intriguing threads I have followed since Gustavos was around. My hats off to you sir. It was a good lesson on many fronts. Networking, integrity, honesty, safety and hard work. Nice job!!!,
I won't be wronged. I won't be insulted. I won't be laid a-hand on. I don't do these things to other people, and I require the same from them.” John Wayne-- The Shootist
NEWBS READ THIS THREAD ABOUT REFINING!!!!
http://www.scrapmetalforum.com/off-t...ning-read.html


|
|


Just a side note on my experiences as a millwright. I was in college and looking for a construction job. The local sawmill burnt down and a large company bought it and contracted out to rebuild it. The contractor was bringing in millwrights from the west coast and Alaska because of their experience. It was the highest paying job in the area. I had no experience. I stopped at the job site and asked for a job. They laughed at me. So my Bohemian stubbornness came out.
Everyday for a week I was at the gate of the job site before any of the employees arrived. The first day the contractor waved as he drove by. The second day he stopped and asked what I was doing. I explained I would wait until he needed another hand. By the end of the week he offered me a gopher job. I started as a grunt on the concrete crew and moved my way up to a finisher. Then the welders came in and I was one of the few concrete people that stayed on. I started out as a grunt, but after work I would practice welding and using a torch. I was horrible but the boss decided to have the professionals teach me while on the job. Quickly I became a welder, but I was still horrible. Could not get the hang of overheads with 3/8 in. gaps. Most of the iron man were let go when the millwrights came in. Buster was a crane operator and I was assigned to him as his rig man. When Buster left he went to Denver and asked that I go as his rig man. Being scared of heights I could not imagine building sky scrappers. I was then assigned to "Grandpa" the top millwright as his gopher. He taught me a lot and went to the boss and said he did not need a gopher, he wanted another millwright. So the boss made me a millwright and I worked with Grandpa everyday. We set the head rig, all the laser guides, saws, merry go rounds, etc. by ourselves while the rest were setting conveyor belts, oiling systems, etc. We also set up the filing room, a neat adventure. I was the last one on the company payroll and gave the tour to the international company big wigs. Another example of paying tuition for an education in the form of sweat instead of a student loan.
They offered me a job and I took it for six months. Then I was ready to go back to school for my degree. Now I am back to what I started with and appreciate this experience more than ever. The company name that believed in me was Mid-Continent out of Sandpoint, Idaho and the owners name was Wes. They no longer exist but maybe someone on this site has heard of them. Many people have helped me in my life, but this one stands out at the moment.
Last edited by Patriot76; 09-05-2013 at 03:58 PM.


|
|


I need to make a correction to my previous post. I claimed to be a millwright, but that is not fair to those in the profession. True millwrights spend many years perfecting their talents and gaining their education. I spent two and a half years being paid as a millwright although I was only doing what I was told to do and told how to do it. There is a big difference. The rest of the time I was a grunt or being paid as something else.
I would also like to point out that each time I went from a gopher to a skilled position, I got a raise. Every time that crew left and I went back to being a grunt, I was demoted. I did not care, I was still working and learning. Now to put it in perspective in 1980 I was making $ 10 an hour as a grunt and $ 15 an hour in the skilled positions. I was still going to school part time and this money was unbelievable at the time.
Now back to the thread. One of the managers of the water district asked me today if he sent certain pictures to me. He showed me the pictures and they will be posted here after I get them. One of the video's put the hair on the back of my neck on end even though I was in the loader when the video was shot. That video will demonstrate the risk that real professionals take everyday. Thank you again to the managers of the water district for their insight, ideas, and the pictures.
Last edited by Patriot76; 09-06-2013 at 02:42 AM.


Just caught this thread. How long did it say it took you to do this???? Awesome that you landed the job and I hope you made money. I have cut up plenty of water tanks like this over my life. You could have just cut a smile in the tank and it will keep folding over and folding over. Cut smile piece off and repeat. Its fairly easy but I am sure you had your fair share of OH SH1T moments while doing this. I can tell because there random pieces of the tank cut out. Cuts to nowhere show inexperience lol. I do like the fact you cut out a roof vent hole for the smoke. You live and you learn and the only way to learn is on the job experience. It was everyone's first day on the job at one point in there life. So after the first week what did you learn and what would have you done differently if you could have started all over from scratch with the tank standing and no holes in it? What torches did you use and what size tip?
They could have made it more challenging with a pump house and a fence next to it. I have had to pull the tank away from the pump house. Cut the piping loose and avoid crushing the fence and sending the tank spilling out into the street. Fun Fun Fun. Its kinda fun downing huge upright tanks like this to. Just two guys with a torches in the middle of the tank and start cutting a smile. Its sweet to see huge tanks just fold up like a lawn chair and a huge cloud of dust on the ground. Unsafe and dangerous hell yeah. Any heavy duty scrap work is dangerous. Now your ready to demolish the cities wasterwater treatment plant when the time is ready. Open tanks with no roof are way easier. Hell you already cut up the hard tank. Keep us updated with whats next. I love hearing about big scrap jobs. TONNAGE!!!!


|
|


This is a picture of the top tier of the filter after cutting the last spoke and dropping it. It was cut as prepared iron to make it easier to haul. I started at the open end cutting five ft. slices along the length. After cutting as much as I could from the ground on both sides I just rolled it to access the rest of it. Then I did the same thing with the lid side. You can see one of the pipes in the middle. There were a lot of pipes that you cannot see.
This was my first experience with the magnesium pipe. It prevented hydroelectricity from poking pin holes in the tank over time. When I tried to heat it with the torch sparks flew everywhere. I did not know what it was and no one was around to ask so I broke out the saw zaw. There was also a lot of pvc pipe in the filters as well. It was hard to cut the other pipe without heating up the pvc. The pvc produces a horrible smell and the smoke was a problem cutting inside the filter. Probably filled my lungs with some chemical that they did not need.
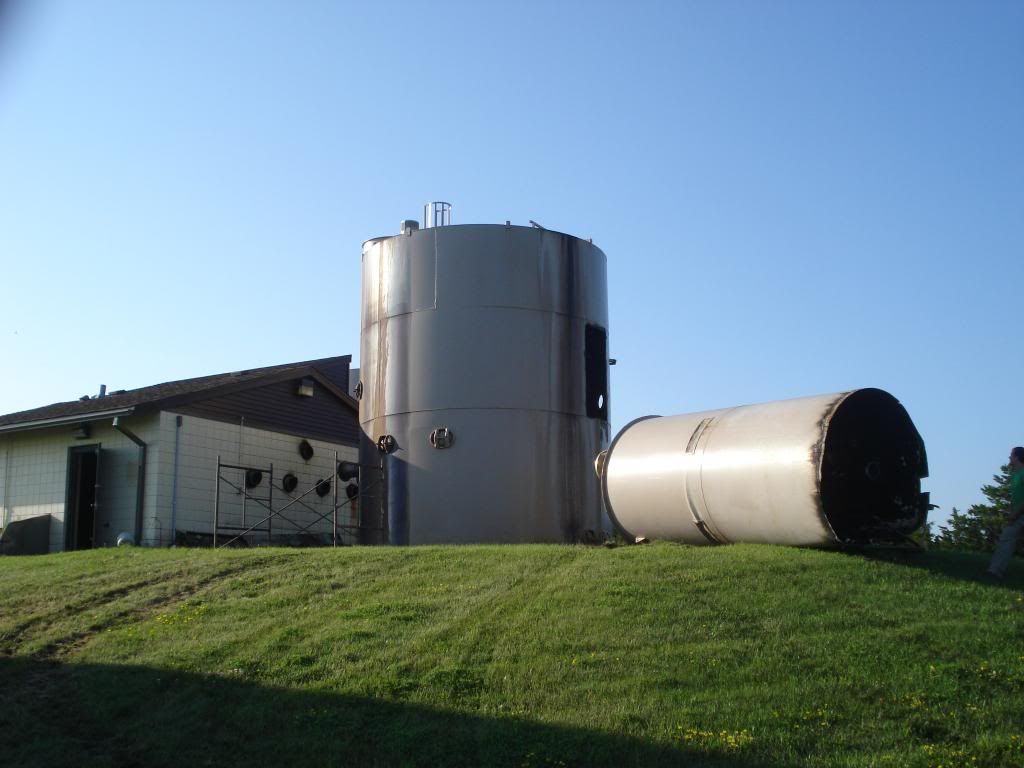
Last edited by Patriot76; 09-06-2013 at 02:59 AM.


|
|


This picture puts a lot of things in perspective. This picture was provided by one of the water district managers.
First the timing of the project. You can see the status of the water tank at this point just after it was pulled over in a previous video. You can see the top of the first filter that came off without a hitch, but of coarse I do not have a video of that. To the right you can see the second top hung up in the air, this is the one in the video. This must have been about the time they told me to use a tire on the tow chain. Remember the flying chain in the video when the top of the filter would not fall.
Earlier in the post I talked about the chain breaking when I was trying to pull over the water tank and I thought it traveled about 100 yds. That was inaccurate and this picture puts it in perspective. I am going to take the time to explain this because of the danger it posed. Imagine the loader to the far left of the picture about 80 yards in front of the tank. The chain was attached to the highest point on the right side of the tank, came over the top, and connected to the loader. The gravel road in forefront of the picture heads straight out to the paved road. When the chain broke it sling shot over the water tank, over the building, and landed in the gravel road. 200 yards plus. Imagine that hitting someone.
Now to get a perspective of the size of the project. You can see the old building between the two filters. That is me by the left filter in a white t-shirt. My 2000 F-350 diesel, gooseneck trailer, and loader are in the foreground.
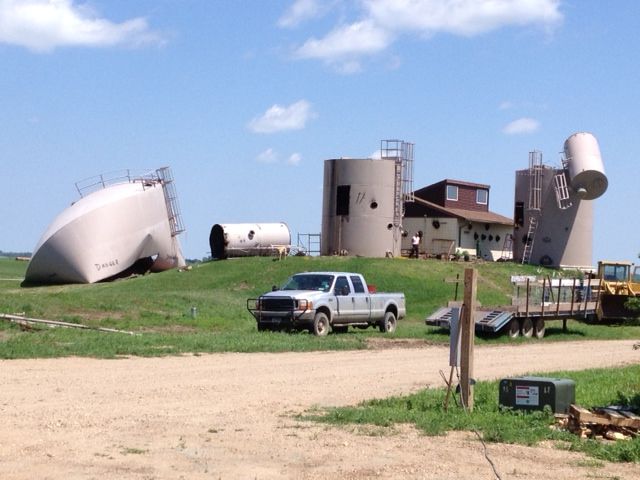
Last edited by Patriot76; 09-08-2013 at 04:40 AM.


|
|


Piston,
Wish you were around when I was seeking advice on how to attack this project. I am interested in your smiley technique. How did you avoid creating stress points throughout the entire structure? Is there a reason you cut from the inside instead of the outside?


|
|


Earlier in the post I talked about the cast iron pipe. This is the first load that I hauled from the project. Some of this pipe came from inside the pump house and the water district had already dismantled it before I started (second picture). The rest is from the pipe I cut between the pump house and the filters.

Last edited by Patriot76; 09-07-2013 at 05:00 AM.


|
|


Detailed cutting was required for the second level of the filter. The top had two 8 in. cast iron pipes running across the top welded on four braces about one foot tall. In addition to a 1/4 in. roof it had 1/4 I-beams in a spoke like formation running from the center to the edges. These were 4 in. tall and connected with two rings of 1/4 in. steel. These were taken off before the 2nd level was pulled down.
The side wall was cut just above the roof for the bottom level. In the video you can see the tire that was discussed earlier. You can also see the door that was cut to access the inside before the top level was pulled down. The video was shot by one of the water district managers.
http://s1277.photobucket.com/user/mi...76089.mp4.html
Last edited by Patriot76; 09-07-2013 at 05:11 AM.


|
|


After cutting off the second level it was time to cut the side walls off the first level. The base has a roof, sub-floor, and main floor. The tank was built in quadrants and this photo shows two. You can see more cast iron pipe on top, very similar to the top of the second level. On the bottom of the roof you can see a vent system with chambers made of 1/4 in. steel. You can see the black sand that created all kinds of problems from this point on. Below the sand is another layer of gravel.
The vent system had to be cut from the roof which meant crawling onto the sand and over head cuts.
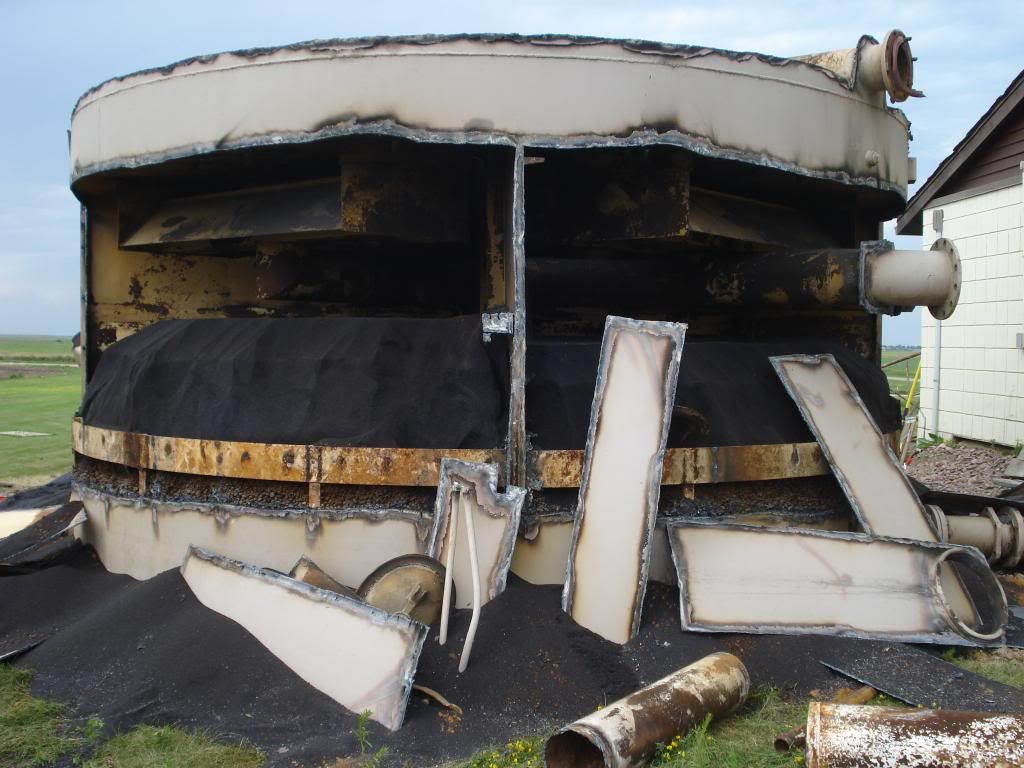
Last edited by Patriot76; 09-08-2013 at 02:42 AM.


|
|


Now you can see the roof design from the base. The second level was similar but had a ring connecting the spokes. Both roofs were cut into fourths as the picture shows. The vents from the previous post had to be cut because of the weight and my one ton skid loader could not pick them up and move them down the hill. The white specks are pvc hoses used to move water through the sand.
After removing the roof it was time to get the shovel out and move the top layer of sand. The remaining part of the filter above the sub-floor was cut as prepared steel.
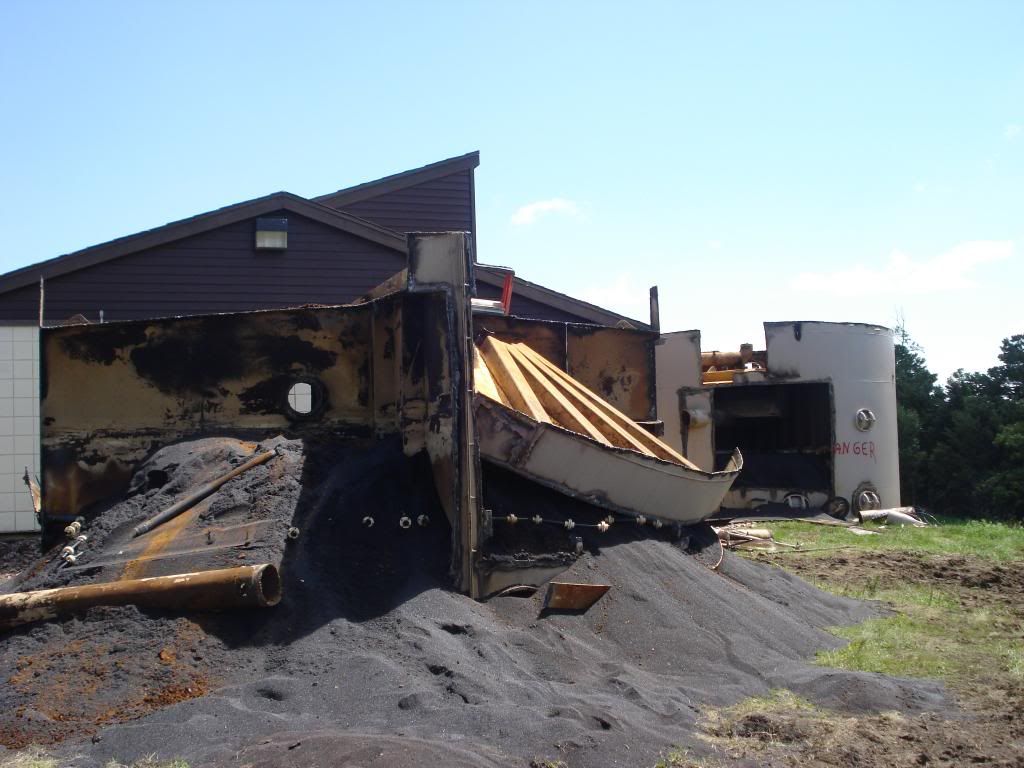
Last edited by Patriot76; 09-08-2013 at 02:51 AM.


|
|


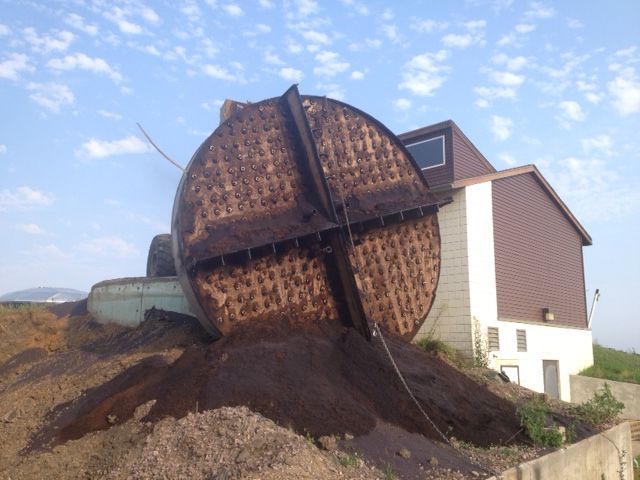
This picture is called "Where's Waldo." Waldo is my loader.
The picture shows the sub-floor and floor to the filter. It was completely full of sand and the loader could not lift them. Each filter presented its own challenge to empty them and the rest of the sand on the sub-floor. This filter was flipped over the embankment and a ditch was dug for the other to flip it.
The sub-floor and floor were connected with 3 in. angle iron every 16 in. Between these supports were five pd. zinc blocks used to prevent hydro-electricity like the magnesium rods. The dimples on the tank are aluminum caps for the zinc bricks.
Last edited by Patriot76; 09-08-2013 at 03:05 AM.


|
|


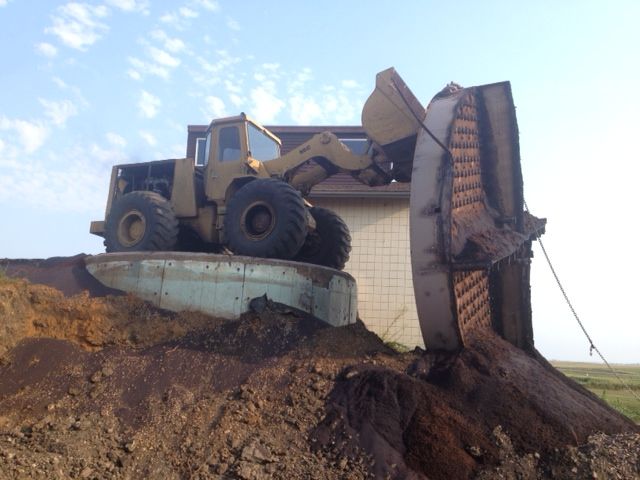
Same situation from another angle. The second picture show the position of the loader on the edge of the base. A few more inches and it would fall down the embankment. In the previous post you can see a four ft. retaining wall. The loader is about 14 ft. above ground level. The tank is completely on its side and I cannot go another inch to flip it. The solution is in the next video.
Last edited by Patriot76; 09-08-2013 at 03:10 AM.


|
|


The water managers came to the rescue again. They hooked the base to their pickup and pulled it over. Now it is a matter of cutting around the angle iron in small pieces. After doing this the tank was flipped again to empty the sand and the rest of the tank was cut into quarters and hauled.
http://s1277.photobucket.com/user/mi...22118.mp4.html
Last edited by Patriot76; 09-08-2013 at 03:16 AM.
There are currently 1 users browsing this thread. (0 members and 1 guests)
Bookmarks