Results 1 to 15 of 15
  1. #1
    WhiteSquirrel started this thread.
    WhiteSquirrel's Avatar
    SMF Badges of Honor

    Member since
    May 2020
    Location
    Ontario, Canada
    Posts
    101
    Thanks
    17
    Thanked 123 Times in 61 Posts

    Fabricating, casting, and shaping a knife handle

    Hey all.

    Been working on a series of project I call : "Why the hell not?" My next step in casting was trying to make a symmetrical form by shaping on single half, then casting it to make a double. This was great a great learning experience!

    This little project is the first that I'm trying to actually get an end product from (which will probably end up in the learning pile!). There are definitely things I would NOT do again (Like using super glue on foam, which apparently melts it), and some things I think i'll carry with me (ways to pack the petrobond for odd shapes).


    Anyways, here's a bit more for my "Extremely unpractical in combat situations" knife project.

  2. The Following User Says Thank You to WhiteSquirrel for This Post:


  3. #2
    eesakiwi's Avatar
    SMF Badges of Honor


    Member since
    Dec 2010
    Location
    NZ
    Posts
    2,531
    Thanks
    2,909
    Thanked 2,556 Times in 1,227 Posts
    Nice !
    I dropped a metal ruler across the bottom 1/2 of a mold once by accident & was quite amused later on to find the indentations of the measurements were very vivid even with it being a average sand grain size.

    And the first thing I thought when you said about casting a handle was 'use deer antler as a mold.

    Thanks for a great Video & the insight into your work.

  4. The Following 2 Users say Thank You for This Post by eesakiwi:


  5. #3
    WhiteSquirrel started this thread.
    WhiteSquirrel's Avatar
    SMF Badges of Honor

    Member since
    May 2020
    Location
    Ontario, Canada
    Posts
    101
    Thanks
    17
    Thanked 123 Times in 61 Posts
    Quote Originally Posted by eesakiwi View Post
    Nice !
    I dropped a metal ruler across the bottom 1/2 of a mold once by accident & was quite amused later on to find the indentations of the measurements were very vivid even with it being a average sand grain size.

    And the first thing I thought when you said about casting a handle was 'use deer antler as a mold.

    Thanks for a great Video & the insight into your work.
    You know what, the thought of casting a deer antler for a handle hadn't even crossed my mind! My hamster is spinning on the wheel now - If I could cast the shape of some antlers in aluminium bronze, and use it as a cap for my hatchet handles (sliding it over the haft)...

    You just added another one to the "why the hell not" pile, thanks!
    Last edited by WhiteSquirrel; 08-15-2020 at 09:41 AM.

  6. The Following 3 Users say Thank You for This Post by WhiteSquirrel:


  7. #4
    SMF Badges of Honor


    Member since
    Apr 2015
    Posts
    2,168
    Thanks
    632
    Thanked 2,503 Times in 1,138 Posts
    Quote Originally Posted by WhiteSquirrel View Post
    You know what, the thought of casting a deer antler for a handle hadn't even crossed my mind! My hamster is spinning on the wheel now - If I could cast the shape of some antlers in aluminium bronze, and use it as a cap for my hatchet handles (sliding it over the haft)...

    You just added another one to the "why the hell not" pile, thanks!
    After watching your videos it's apparent your more of a sculpture than a metal caster.

    I've noticed several things your doing wrong, the pattern is usually fixed to a board which is indexed to the cope and drag, the pattern board is placed on the work bench, the drag placed over then filled with sand. The drag is then turned over.

    You don't just reach in with your fingers to remove the pattern, should have threaded holes that you can screw a rod into, you gently tap on the rod to loosen the pattern before removing.

    With petro bond why are you using two pour holes, one is all that is needed, if your pattern is not filling you need to extend the height of your cope. The added weight of the molten metal in the extended sprue will fill the mold cavity.

    The extended sprue serves another purpose, as the metal in the mold cavity cools it shrinks, the extra molten metal in the extended sprue will feed the shrinkage.

    I've mentioned this on your tube comments but you seem to thrive in repeating your mistakes.

  8. The Following 2 Users say Thank You for This Post by alloy2:


  9. #5
    SMF Badges of Honor


    Member since
    Apr 2015
    Posts
    2,168
    Thanks
    632
    Thanked 2,503 Times in 1,138 Posts
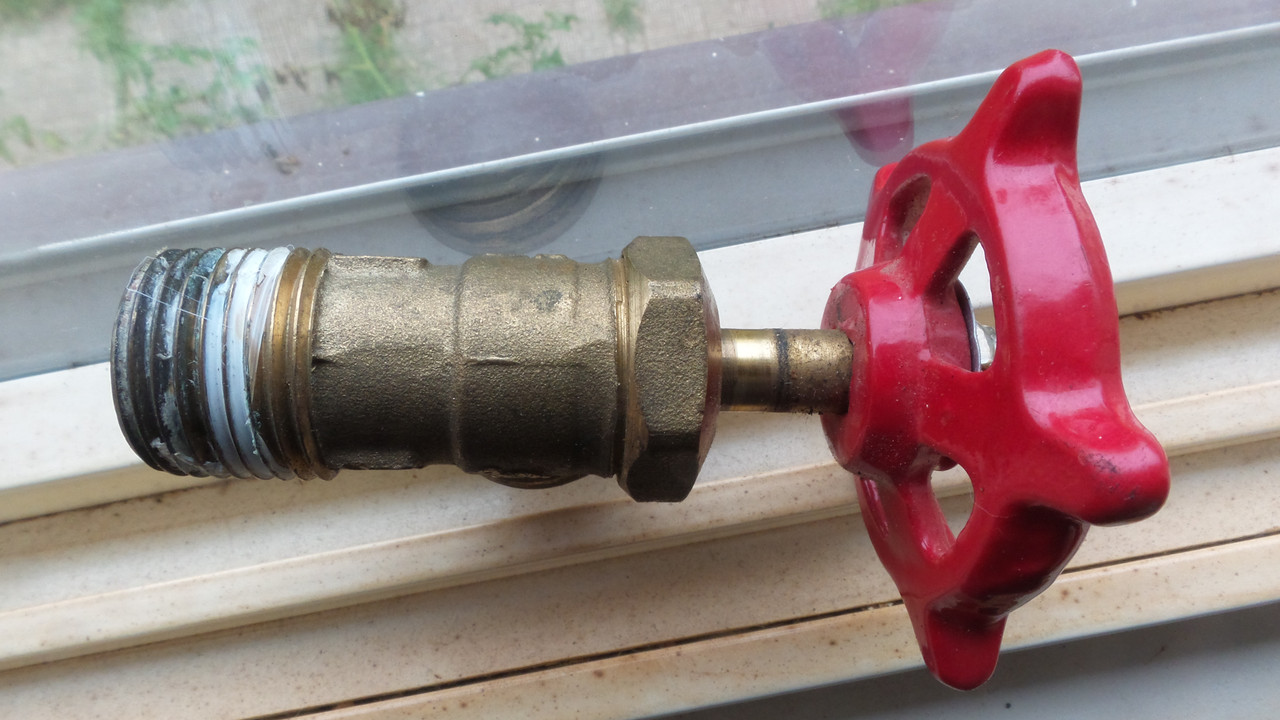
    I suggest you study parting lines, from this brass tap the flashing where the two halves of the pattern met have not been cleaned off and are clearly visible.


    Last edited by alloy2; 08-16-2020 at 10:31 AM.

  10. The Following 2 Users say Thank You for This Post by alloy2:


  11. #6
    SMF Badges of Honor


    Member since
    Apr 2015
    Posts
    2,168
    Thanks
    632
    Thanked 2,503 Times in 1,138 Posts
    Casting the knife handle clearly show you have absolutely no understanding of pattern draft

    You have a long road ahead of you grasshopper, I post this information in hopes that others do not follow in your footsteps repeating the same mistakes.

    Metal casting is one of the many hobbies that I enjoy.

    Understanding Pattern Draft https://www.bentonfoundry.com/wp-con...tterndraft.pdf
    Last edited by alloy2; 08-16-2020 at 10:40 AM.

  12. The Following User Says Thank You to alloy2 for This Post:


  13. #7
    WhiteSquirrel started this thread.
    WhiteSquirrel's Avatar
    SMF Badges of Honor

    Member since
    May 2020
    Location
    Ontario, Canada
    Posts
    101
    Thanks
    17
    Thanked 123 Times in 61 Posts
    Quote Originally Posted by alloy2 View Post
    After watching your videos it's apparent your more of a sculpture than a metal caster.

    I've noticed several things your doing wrong, the pattern is usually fixed to a board which is indexed to the cope and drag, the pattern board is placed on the work bench, the drag placed over then filled with sand. The drag is then turned over.

    You don't just reach in with your fingers to remove the pattern, should have threaded holes that you can screw a rod into, you gently tap on the rod to loosen the pattern before removing.

    With petro bond why are you using two pour holes, one is all that is needed, if your pattern is not filling you need to extend the height of your cope. The added weight of the molten metal in the extended sprue will fill the mold cavity.

    The extended sprue serves another purpose, as the metal in the mold cavity cools it shrinks, the extra molten metal in the extended sprue will feed the shrinkage.

    I've mentioned this on your tube comments but you seem to thrive in repeating your mistakes.
    A comment like that definitely requires a little more clarification from your side. If I get the results I was expecting, how is that a mistake? A more efficient process available? Definitely! The only one that hasn't worked so far is the cup - and I havn't had a chance to retry this with the advice give to me from different sources. My advice from three small casting companies is that the cup walls are too thin to cast with aluminium, which I will challenge using some of the suggestions provided. So let's explore this a little more.

    -For the cope and drag being flipped over, how do you do that with a odd shape like this one? If I would have done it the flat 2 part master way, then the end piece on the pommel would have been buried, or the rounded handle part would have been recessed (I tried this method first, and it did not work with this shape). So seeing the result of the second casting that was identical to the first (and my previous rail road spike castings using this method)- what was the mistake I repeated? Was it just that this method is not as efficient as another?

    -I do agree that pulling a shape out without touching the sand is the best theoretical approach. How would you have pulled this particular shape out without damaging the finish of the face? What how did my approach on this particular piece removal adversely affect the finished product? I do have some dirty edges to clean up normally - does pulling pieces out with a method like this generally help with cleaner edges?

    -For the second sprue, you have mentioned filling both at the same time to reduce material shrinkage affecting the final casting. Smelko, who sold me the petrobond, recommended an entry and exit hole when casting. Chance for heightened efficiency? I'm all ears. Having said that, the half inch holes I use for aluminium doesn't seem to be able to let enough air out and has caused a few air locks and failed castings without a second hole. Adversely, anything copper based (with more mass) has no problem at all. My cope is already at six inches, so if I open up the hole to 3/4" instead of 1/2" maybe it'll give the results with a single hole? Single hole casts i've been seeing in videos are done vertically - do they work as well horizontally?
    I just poured the final hilt over the steel frame. After hardening the blade, I didn't want to heat it and anneal it, so the blade was relatively cold. I put three fill holes since I was worried the molten aluminium bronze would solidify before it finished the form. Would a single sprue hole work with a horizontal pour like this? i didn't want to test it out with this and risk ruining the entire project.

    Bring up some more details or comments, let's talk about it, and see if the next casting project will work out more like a caster made it than a sculptor.

  14. The Following User Says Thank You to WhiteSquirrel for This Post:


  15. #8
    SMF Badges of Honor


    Member since
    Apr 2015
    Posts
    2,168
    Thanks
    632
    Thanked 2,503 Times in 1,138 Posts
    Watch the myfordboy youtube series on metal casting. this boy surpasses my expertise ten fold.


  16. The Following User Says Thank You to alloy2 for This Post:


  17. #9
    SMF Badges of Honor


    Member since
    Apr 2015
    Posts
    2,168
    Thanks
    632
    Thanked 2,503 Times in 1,138 Posts
    Petrobond only requires one entry hole, i use a pneumatic tamper to pack the sand in around the pattern. Sand packs hard as a brick.

    I use a tapered coffee table leg which is positioned before tamping, use a knife to cut in a runner, spoon to scoop out a funnel at the top of the sprue hole, makes pouring the molten metal easier.

    Metal being poured into the cope enters a pocket carved into the sand which resides nearby the mold cavity, a runner is cut from this pocket to allow metal to enter the mold cavity.

    The pocket serves two purposes, feeds metal into the mold cavity then feeds shrinkage, any junk ( dross ) floats to the top on this pocket so only clean metal reaches the mold cavity.

    Use a plastic straw to gently blow out any loose sand that enters the mold cavity.

    On a side note we would not be good neighbours, you make much too much noise.

  18. The Following User Says Thank You to alloy2 for This Post:


  19. #10
    SMF Badges of Honor


    Member since
    Apr 2015
    Posts
    2,168
    Thanks
    632
    Thanked 2,503 Times in 1,138 Posts
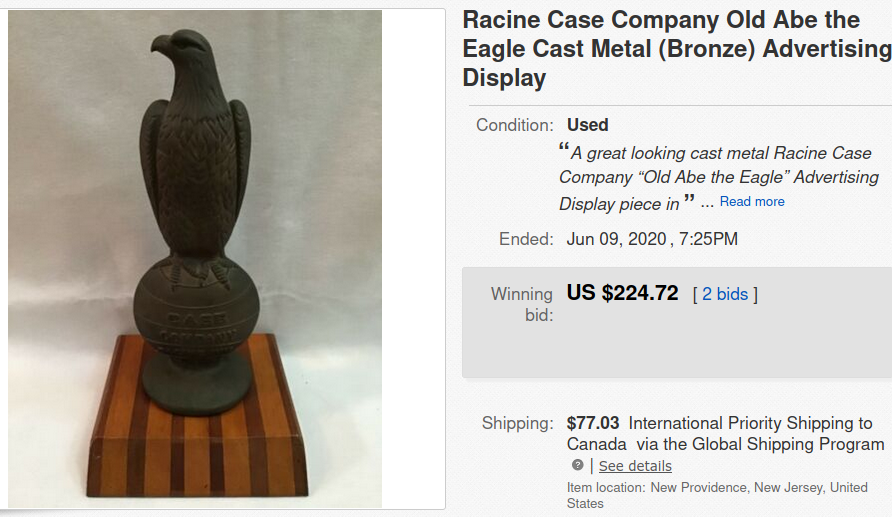
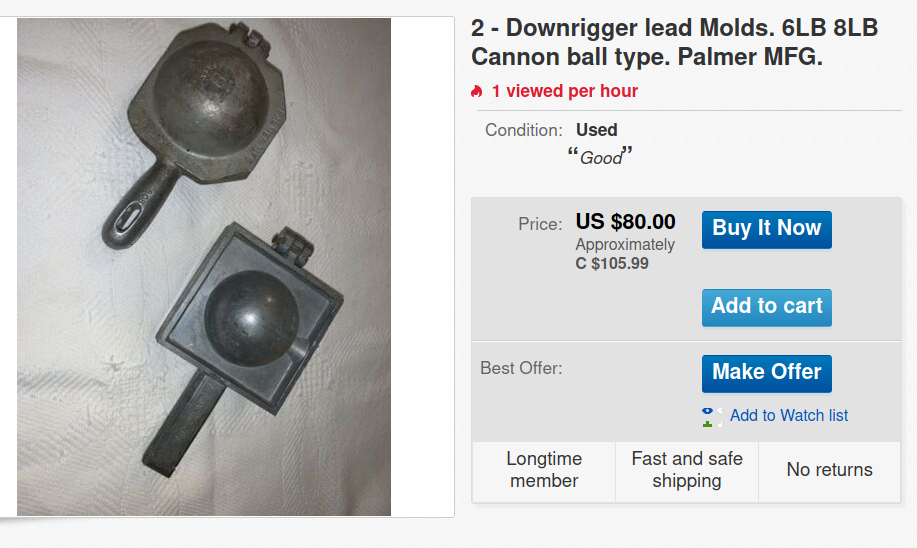
    This is some of the stuff i was casting from my home foundry, down rigger and scuba weight molds from aluminum, some Old Abe fence finials.

    Authentic Old Abe's were made from cast iron all others like the one below are fake copies, just like the aluminum one's that i made.


  20. The Following User Says Thank You to alloy2 for This Post:


  21. #11
    SMF Badges of Honor


    Member since
    Apr 2015
    Posts
    2,168
    Thanks
    632
    Thanked 2,503 Times in 1,138 Posts
    If a hick like me is able to cast the hinges used on this type of down rigger mold, why are you finding so difficult to cast the pommel.

    I had similar handles made from the longer sprues turned in my metal lathe, then used a knurling tool to make them easy to grip, used recycled threaded studs from aluminum intake manifolds threaded into both the handles and the mold.


  22. The Following User Says Thank You to alloy2 for This Post:


  23. #12
    SMF Badges of Honor


    Member since
    Apr 2015
    Posts
    2,168
    Thanks
    632
    Thanked 2,503 Times in 1,138 Posts
    Ever wonder how the artist was able to cast a bronze sculpture being hollow in the centre.

    The pattern would have been wax encased in plaster, one side to the sculpture would have been left open to receive the bronze.

    Filled to capacity, the artist now counts down allowing enough time for an egg shell to form inside the mold. Then the mold is tipped to removed excess metal.

    From the same lot of bronze used to make the original casting several brazing rods were made from the same lot to assure consistency in a colour match, a patch is made then brazed to cover the hole.


    Last edited by alloy2; 08-16-2020 at 10:20 PM.

  24. The Following 2 Users say Thank You for This Post by alloy2:


  25. #13
    SMF Badges of Honor


    Member since
    Apr 2015
    Posts
    2,168
    Thanks
    632
    Thanked 2,503 Times in 1,138 Posts
    Quote Originally Posted by WhiteSquirrel View Post
    A comment like that definitely requires a little more clarification from your side. I
    More clarification from my side is pointless, as i have found that you have an issue with those who pose as an authority.

    I'm still in my infancy when it comes to knowledge, I had the good fortune of having very knowledgeable father who made sure all the right books were laying about the house. No television and hated it when my best friends family got theirs, lost a friend to cyclops.

    Imagine that, a black and white TV swallowed up a whole family.

    As usual I'm just passing through, have no plans on being a permanent fixture on the scrap forum.

    So much has changed on the forum and my interests have also changed, and I don't have anything new to share.

    I'm probably hold the record for the most banned member, had so many Nic's I don't remember them all.

    I believe gustavus was my first.
    Last edited by alloy2; 08-16-2020 at 10:58 PM.

  26. The Following 2 Users say Thank You for This Post by alloy2:


  27. #14
    SMF Badges of Honor


    Member since
    Apr 2015
    Posts
    2,168
    Thanks
    632
    Thanked 2,503 Times in 1,138 Posts
    Next time you decide to cut foam for a pattern use a hot wire as it melts the beads together and don't show up in the finished casting.

    Also high density foam works best.

    The wire used for the cutter is nichrome, use an old computer supply instead of the expensive 9 volt battery.

    Last edited by alloy2; 08-16-2020 at 11:21 PM.

  28. The Following User Says Thank You to alloy2 for This Post:


  29. #15
    RustyDollars's Avatar
    SMF Badges of Honor

    Member since
    Jan 2012
    Location
    Central Wis
    Posts
    426
    Thanks
    438
    Thanked 533 Times in 213 Posts

    Thumbs up

    Quote Originally Posted by alloy2 View Post
    With petro bond ... if your pattern is not filling you need to extend the height of your cope. The added weight of the molten metal in the extended sprue will fill the mold cavity.
    Thanks for that tip. I think that is the answer to my brass moldings not filling completely. Thanks again. Jim


  30. Similar threads on the Scrap Metal Forum

    1. Hollow knife rough forging
      By WhiteSquirrel in forum Made From Scrap
      Replies: 6
      Last Post: 08-16-2020, 11:12 AM
    2. Anyone Seen a Swiss Army Knife for Scrappers?
      By recyclersteve in forum Scrap Metal Questions and Answers
      Replies: 7
      Last Post: 11-04-2018, 01:52 AM
    3. my utility knife wound
      By hunterandscrapper in forum Off Topic Discussions
      Replies: 19
      Last Post: 08-17-2014, 02:03 AM
    4. Oyster Knife
      By charn in forum Tools and Equipment
      Replies: 3
      Last Post: 02-10-2013, 09:14 AM
    5. Xacto knife blades
      By ScrapBilly in forum General - Let's talk business
      Replies: 10
      Last Post: 12-27-2012, 11:27 PM

Thread Information

Users Browsing this Thread

There are currently 7 users browsing this thread. (0 members and 7 guests)

 
Browse the Most Recent Threads
On SMF In THIS CATEGORY.


OR

Bookmarks

Posting Permissions

  • You may not post new threads
  • You may not post replies
  • You may not post attachments
  • You may not edit your posts
  •  

The Scrap Metal Forum

    The Scrap Metal Forum is the #1 scrap metal recycling community in the world. Here we talk about the scrap metal business, making money, where we connect with other scrappers, scrap yards and more.

SMF on Facebook and Twitter

Twitter Facebook